The air in Lythos Castle was thick with the scent of ozone and decay. After a relentless pursuit across Elyos, Alear and their ragtag army of allies finally cornered the elusive Zephia and the corrupted Veyle within the ancient stone halls. But this was no simple confrontation; it was a last stand, a brutal slugfest against a tidal wave of Corrupted warriors. No clever tricks or map gimmicks here, folks – just good old-fashioned tactical warfare where the enemy was throwing the whole kitchen sink at them. The mission was clear: reclaim the Emblem Marth and, against all odds, reach out to the sliver of Veyle that might still be saved. Talk about a tall order.
The Big Bads: Know Your Enemy
Every seasoned commander knows that intel is half the battle. Let's break down the heavyweight champions waiting to ruin your day.
| Boss | Key Threat | Major Weakness / Strategy | Special Notes |
|---|---|---|---|
| Zephia | Thoron Tome (Long-range magic), Flying mobility, Revival Stone. | Brute force damage. Engage Attacks are your best friend. | Trigger Warning: Engaging her summons a squad of fliers at the map entrance. Pick your moment! |
| Griss | High Magic Damage (but no Emblem Celica this time!). | Exploit his paper-thin Defense with physical attackers. | Heads up: His Excalibur Tome will make mincemeat of your flying units. He advances after a few turns. |
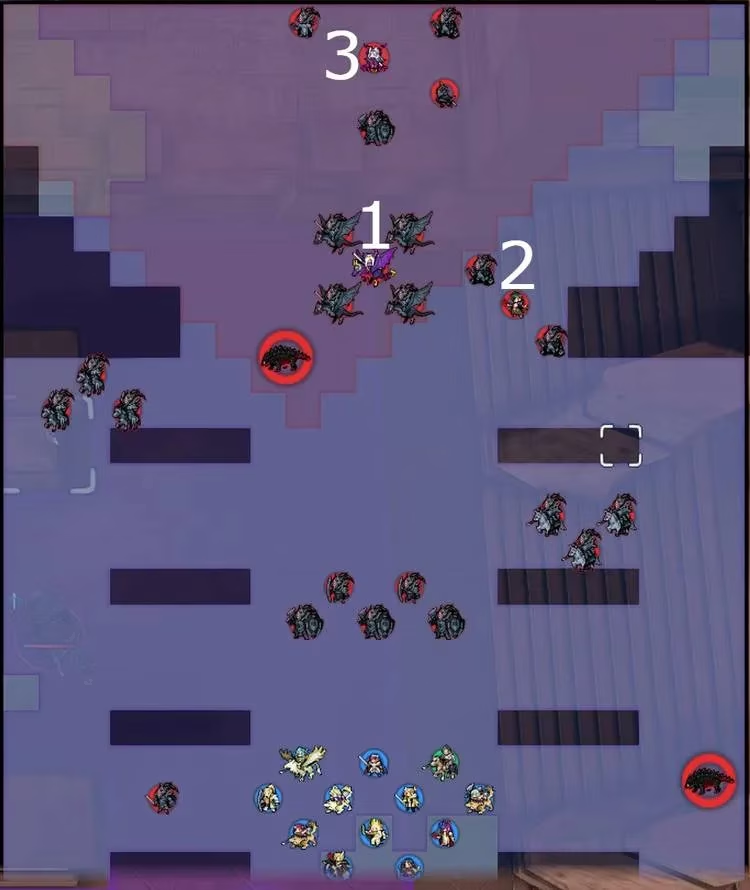
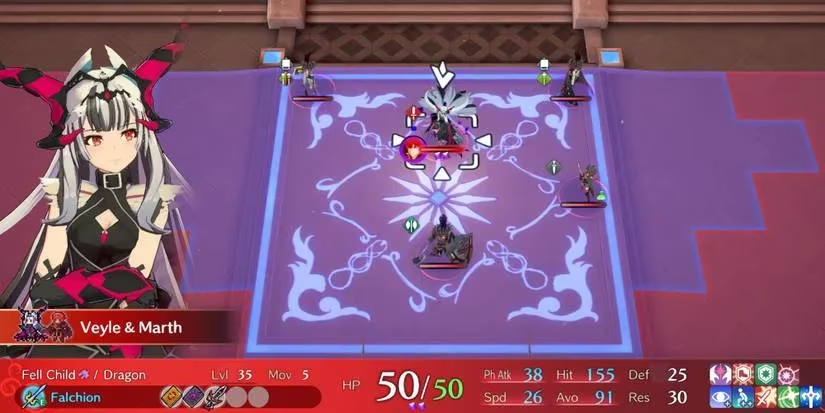
| Veyle & Marth | Devastating mix of physical (Lodestar Rush) and magical damage. TWO Corrupted Revival Stones. | Requires extreme caution. Bait carefully to separate her from her weapon. | The Real Deal: Attacking her triggers massive reinforcement waves. This is the main event. |
Zephia was, as always, a tough nut to crack. Her Defense and Resistance were nearly identical, meaning there was no easy stat to exploit – you just had to hit her hard and fast. And with that pesky Revival Stone, you had to do it twice. On higher difficulties, her Stalwart skill meant even her bow weakness wasn't a surefire win. The real kicker? The moment you committed to fighting her, a whole air force would spawn at your back door. Timing was everything.
Griss, thankfully, had lost his Celica-shaped crutch. He was still a glass cannon of magical destruction, but without the warp shenanigans. His low Defense was a glaring invitation for your beefiest fighters to get up close and personal. Just remember, his Excalibur Tome was a hard counter to any fliers, so keep your Wyvern Knights and Griffon Riders on a tight leash. He'd get impatient and march toward you after a while, which could be used to isolate him.
Then there was Veyle. Oh boy, had she powered up. Wielding Marth's power, she could unleash the iconic Lodestar Rush for massive physical damage while still threatening from range with magic. This combo made her a nightmare to bait. Sending the wrong unit into her range was a one-way ticket to the Somniel. And once you did engage her, defeating her first health bar would unleash her two Corrupted Revival Stones and call in reinforcements like she was ringing the dinner bell.
The Game Plan: A Turn-by-Turn Mindset
This battle was a marathon, not a sprint. Rushing in was a surefire way to get your team wiped off the map. Here's the lowdown on the recommended route:
-
Hunker Down & Hold the Line: The initial turns are all about defense. Reinforcements will pour in from the east and west. Your job is to form a solid defensive formation, likely near your starting position, and weather the storm. The Wyrms in these waves are no joke, but by Chapter 21, you should know the drill. Deal with them methodically.
-
Deal with Griss (The Isolated Threat): Once the initial reinforcement streams dry up, Griss will start his advance. This is where you could get creative. Remember that Entrap Staff you (hopefully) snagged earlier? This was its moment to shine. Yanking Griss right into the heart of your death ball and ganging up on him was a classic move. If not, lure him away from his allies and crush him with your physical powerhouses.
-
Tackle Zephia (Mind Your Six): With Griss down, Zephia is next. You could use Lyn's Astra Storm to ping her and aggro her forward. But don't get tunnel vision! The moment you fight her, those flier reinforcements spawn at the entrance. You absolutely must have a backline or some hardy units ready to pivot and deal with them, or you'll be caught in a pincer. Again, Entrap could work, but beware her devastating melee sword.
-
The Finale: Veyle (All or Nothing): After clearing Zephia and her friends, take a breather. Heal up, recharge Engage meters, and position your absolute strongest hitters. The push toward Veyle is the point of no return. Baiting her is the trickiest part. Because she has a Thoron Tome, you can bait her with a unit that has high Resistance. This will usually cause her to attack with magic at range, meaning she won't use the deadly Lodestar Rush. It also forces her to unequip Falchion, making her safer to approach. Once she's committed, unleash hell. This is where Byleth's Goddess Dance earns its keep, granting a second round of attacks to your best units. The goal is to obliterate her before her reinforcement horde overwhelms you.
Loot Check: Don't Leave Valuable Gear Behind!
No victory is complete without spoils. While Caladbolg and Spirit Dust are automatically yours for defeating Zephia and Griss, there's one legendary item that's easy to miss.
⚠️ Critical Alert: The Missable Carnwenhan ️
Right next to Veyle, a Corrupted Thief is skulking about, holding the legendary dagger Carnwenhan. If you defeat Veyle and complete the map without dealing with this thief, the dagger is gone for good – a total heartbreaker for any collector. The good news? The thief has slightly more movement range than Veyle. You can carefully bait it out with a durable unit, eliminate it, and secure the prize before triggering the final boss meltdown. Don't get so focused on the big boss that you forget the pickpocket!
Final Pro-Tips from the Trenches:
-
Engage Management is Key: This map tests your endurance. Don't blow all your Engage turns on the first wave. Save big abilities like Lodestar Rush, Astra Storm, and Goddess Dance for the boss takedowns.
-
The Arena & Meal Buffs: If you're struggling, a quick trip to the Somniel before the battle to cook a potent meal and spend some bond fragments on Arena training can give your key units the extra edge they need.
-
Class Synergy: Having a mix of high-Resistance units (to bait mages), sturdy armor knights (to hold chokepoints), and high-mobility damage dealers (to quickly eliminate key threats like the thief) makes this battle much more manageable.
Conquering 'The Return' was a true test of a player's mastery over Fire Emblem Engage's systems. It was chaotic, demanding, and incredibly satisfying to overcome. By understanding the enemies, executing a patient strategy, and keeping an eye on the loot, Alear's army could reclaim their home and take one step closer to saving all of Elyos. Now, that's what I call a good day's work.