The air was thick with tension as Alear's army, weary yet resolute, marched forward after the brutal clash at The Dead Town. Their sights were set on the looming silhouette of a castle, now a den for the Corrupted and the sadistic mage Griss. This wasn't just another battlefield; it was a realm of shifting darkness where every shadow could hide a lethal surprise. For any commander, this chapter, "The Kingless Castle," is the ultimate test of tactical foresight and unit management. Buckle up, because we're diving deep into the strategies that separate the rookies from the legends in this shadow-cloaked nightmare.
The Shadow Realm: Understanding the Core Mechanic
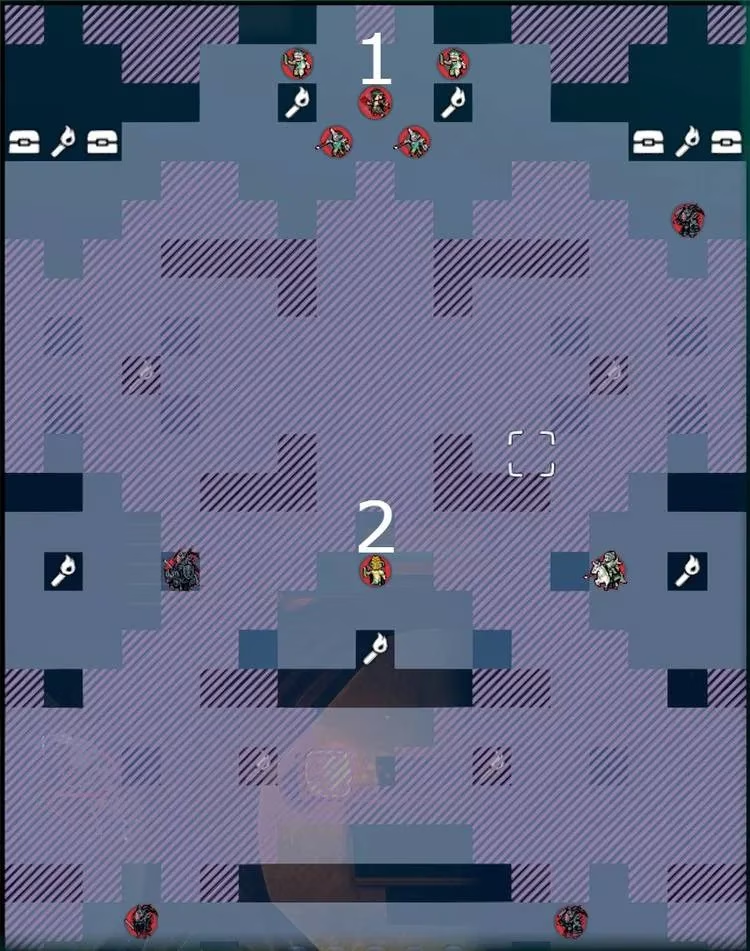
Right off the bat, this map throws a curveball that'll make you say, "Oh, come on!" Large sections are shrouded in darkness. Here's the deal:
-
❌ You cannot see enemies lurking in the black.
-
❌ Your units cannot move into unlit tiles.
-
✅ Enemies can and will ambush you from the dark.
The key to survival? Staggered advancement. You must use your front-line units as living torches, moving them just enough to reveal new terrain for your backline to safely occupy. It's a slow, methodical dance, not a mad rush. Pro-tip: Light the permanent torches scattered around the map whenever possible. They create safe zones of vision, giving you breathing room to reposition.
Notable Foes: Know Thy Enemy
Let's break down the major threats waiting in the dark. This isn't just about stats; it's about understanding their gimmicks.
| Enemy | Role / Gimmick | Primary Threat | Counter Strategy |
|---|---|---|---|
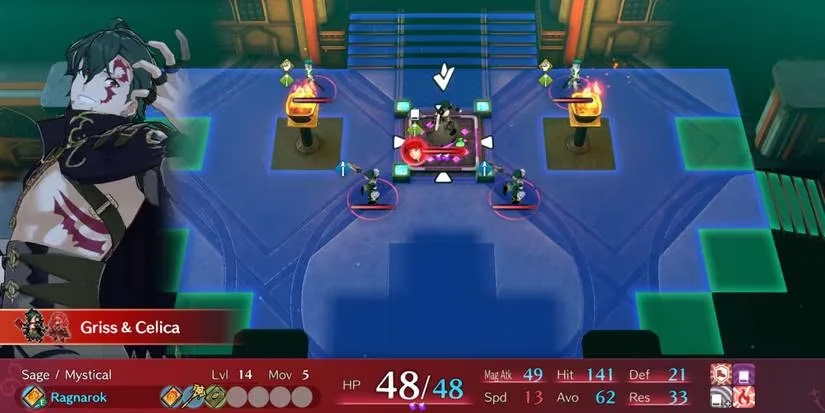
| Griss (w/ Celica) | Teleporting Boss | Echo (attacks twice), Chain Attacks | Rush early, break his Revival Stones |
| Elusian Soldier | Support/Disabler | Entrap Staff (teleports your unit) | Snipe with Astra Storm or bait with a tank |
| Wolf Knights | Ambush Cavalry | High Move, Peshkatz wielder | Defensive formation, anticipate spawns |
| Thieves | Loot Stealers | Fleeing with chest items | Intercept and eliminate on sight |
-
Griss & Celica: The main event. This guy is a total wild card. He starts teleporting around the map randomly, which is a major pain. However, he's got a critical weakness: his Corrupted Revival Stones. Pop one of those bad boys, and he'll nope out, retreating to his throne at the top. His stats? Honestly, he's a bit of a glass cannon—high magic damage but can't take a physical beating. The real kicker is Celica's Echo skill, letting him attack twice and potentially trigger a barrage of chain attacks from nearby enemies. You don't want him getting that off on a squishy unit.
-
The Elusian Soldier with the Entrap Staff: This dude is public enemy number one. That Entrap Staff can yoink your best unit right into the heart of the enemy formation. It's a recipe for a game over. You must have a plan for him.
The Pro-Gamer Route: A Step-by-Step Breakdown
Alright, listen up. Here's how you clear this map like a boss, minimizing RNG and maximizing efficiency.
Phase 1: The Opening Gambit (Turns 1-3)
-
First Move: Do not spread out. Bunch up near your starting point and assess.
-
The Griss Rush (The Big Brain Play): Griss always spawns first in the bottom-right corner, just outside a torch's light. This is your golden ticket. If you've got Byleth and Seadall, you can pull off a legendary opening move. Use Goddess Dance on your strongest physical attackers (think Diamant, Kagetsu, or a forged weapon user), then have Seadall Dance for one of them again. You can often reach Griss and destroy one of his Revival Stones before he even gets a turn to teleport. Boom. Threat neutralized early. It's a high-risk, high-reward play that sets the tone for the whole map.
-
If you can't rush Griss, don't sweat it. Just advance cautiously, lighting torches and using an Illume Staff. You can buy a cheap one, and any staff user (Griffin Knight, Micaiah user, etc.) can equip it to reveal a 7-tile radius. It shrinks each turn, but it's a lifesaver for scouting.
Phase 2: The Middle Game & The Entrap Dilemma (Turns 4-8)
-
Slow Push North: With Griss temporarily out of the picture, advance northward. Keep your squishy mages and archers tucked safely behind your tanks. The shadows are your real enemy here.
-
Thief Alert! As you approach the second "row," thieves will spawn and bolt for the chests flanking Griss's final position. You must block their escape routes. The loot is too good to lose (see loot table below!).
-
Dealing with Mr. Entrap: You have three solid options:
-
The Surgical Strike: Have a high-strength unit (like Panette or a berserker) use Lyn's Astra Storm to snipe the Entrap soldier from a safe distance. Clean and effective.
-
The Bait & Switch: Let your tankiest unit (preferably paired with Ike for that insane defense) get yoinked. They'll survive the surrounding onslaught, and you can then swarm in to clean up. It's a bold move, but hey, no guts, no glory.
-
The Dodge Tank Gambit: Stack Avoid on a speedy unit (Yunaka in cover is the queen of this) and hope they dodge the Entrap. If they do, the soldier is left vulnerable and close. It's RNG-dependent, but oh-so-satisfying when it works.
-
Phase 3: The Final Approach & Boss Kill (Turns 9-12+)
-
Beware the Wolf Pack: Just south of Griss's final perch, three Wolf Knights lie in wait. You likely won't see them until they charge. Hold your front line strong. One carries Peshkatz, a savage knife you'll want to claim.
-
Griss, The Final Confrontation: By now, he's back on his protection tile. He's dangerous but fragile. DO NOT send a magic-vulnerable unit into his range. Instead:
-
Use a high-Resistance unit (like Celine, Citrinne, or a well-built Mage Knight) to bait his attack.
-
Surround him on your next player phase. He has poor Speed and Defense, so physical attackers will melt him.
-
Watch out for his remaining Corrupted allies. Clean them up first if needed to avoid chain attacks during the boss fight.
-
Loot Table: Claim Your Rewards
Victory isn't just about survival; it's about getting the goods. Here's what's up for grabs:
From Defeated Enemies (Guaranteed):
-
🗡️ Excalibur (Powerful Wind Tome, great for flier control)
-
Entrap Staff (Now you can do the yoinking!)
-
🔪 Peshkatz (A fantastic knife with great effects)
From Chests (Must be opened or stolen from thieves):
-
💰 5000 Gold (Always welcome)
-
⚗️ Spirit Dust (Permanently boosts Magic)
-
️ Dracoshield (Permanently boosts Defense)
-
❤️ Seraph Robe (Permanently boosts HP)
The stat boosters are incredibly valuable for min-maxing your favorite units in the late game. Letting the thieves escape is basically throwing away power. Don't do it!
Final Pro-Tips:
-
🔄 Positioning is EVERYTHING. Always end your turn with units in supporting defense positions.
-
👁️ Use the Illume Staff proactively, not reactively. Light up the path you plan to take next turn.
-
Prioritize threats: Entrap Soldier > Thieves > Wolf Knights > Griss's mobs > Griss himself.
-
😎 Remember, sometimes the best move is to end your turn and let the enemies come to you in your lit, fortified zone. Patience, commander. This map is a marathon, not a sprint. Now go forth and reclaim those Emblem Rings! You've got this.